NextJS deployment pipeline on S3 with Gitlab-CI


Huge thanks to Chợ Tốt web engineering & SRE team (Site Reliability Engineering) and especially Kelvin Vuong, Toan Vu and Anh Dang for helping!
Overview
NextJS was released in 2016. Since then it has become one of the largest frameworks that support Server-side Rendering (SSR) with ReactJS & NodeJS. Being one of the first companies in Vietnam which have applied NextJS to develop products, we have encountered interesting challenges and learned throughout development to deployment processes. In today’s topic, I am going to share about how we dealt with the deployment step which helped us achieve 2 big milestones.
- Web team and SRE (Site Reliability Engineering) team work independently.
- Only one step to production.
Problem
Mapping URL to static resources.
After setting up a brand new project, developers jump into setting up the deployment environment based on the SRE rules to have a smooth workflow. Here are what we usually need:
- Identify the available IP & port.
- Register the service with the available IP & port.
- Ask for the domain to map to the service.
For a web application, some extra items need to be handled. In order to go live, you need to specify some static resources and assets such as CSS files, JS files and images… So we need to list out every resource with a specific URL and then work with SRE team to map with the IP & port.
For example:

A manual approach to do this is simple and easy to setup. However, there would be challenges as follow:
- If the page has a lot of resources. We need to manually list out each resource with a specific domain. It takes a lot of time.
- And because we have a lot of services and small web apps. Consequently, the mapping config file from the SRE team becomes huge.
- Sometimes the mapping config file has conflicts between services, for example, the other team has registered the URL to their own resource.
Depends on SRE team
There were a lot of services of Chợ Tốt which depend on the SRE team. Every time we start a new web app, we need to come to the SRE desk and ask for mapping URLs to static resources and when the configuration becomes more complicated such as this URL was taken by another web app and we did some “hack” to make it work. Consequently, it leads to creating some bugs of other web apps. Then we revert back to the origin to find another solution.
For those reasons, the Web team & SRE team come to the solution which helps the automation CI/CD pipeline of the whole system.
Solution
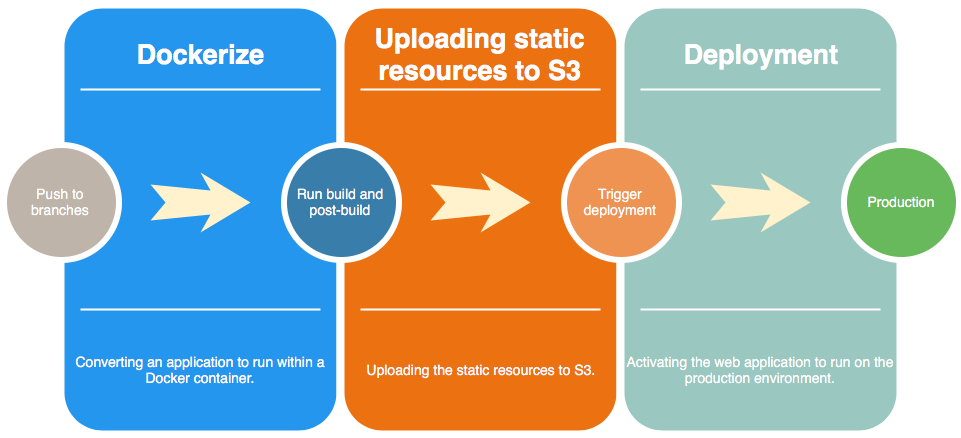
When the code is merged to the specific branch (master or staging or release). The CI/CD flow will be triggered to execute. The CI/CD has 3 stages.
Dockerize
Converting an application to run within a Docker container.
Uploading static resources to S3
After dockerizing the web app, we do some post processes, then start uploading the whole build directory to S3.
S3 here is actually Chợ Tốt server and we apply the interface of AWS S3. So uploading static resources to S3 means uploading to our own server.
Deployment
Activating the web application to run on the production environment.
Hands-on
Below is the structure of the project. You could find it at cna
my-app
├── deployment/
  └── post-build/
  └──── index.js
  └── s3/
  └──── index.js
├── app/
  └── …
  └── next.config.js
  └── …
├── package.json
In this section, I’ll cover 4 points.
- Bucket name
- Credential
- Configs
- Deployment
Bucket name
The first thing we do is to define a good convention name for the S3’s bucket. To do that, we manually create by using commands of AWS S3 SDK. The bucket name is the combination of service name and environment.
<SERVICE_NAME>_<ENVIRONMENT>For example 1:
The service name “chotot-vehicle”. And the bucket name is
- staging: CHOTOT_VEHICLE_STAGING
- production: CHOTOT_VEHICLE_PRODUCTION
For example 2:
The service name “chotot-property”. And the bucket name is
- staging: CHOTOT_PROPERTY_STAGING
- production: CHOTOT_PROPERTY_PRODUCTION
Credential
We make use of Gitlab via “Secret Variables” feature which provides the setting allows adding “Credential Information” as the environment variables.(I believe other CI/CD has the same feature such as TravisCI, CircleCI, …).
By doing this way, we follow the Separation of Concerns (SoC) design principle. The development does not have to care about the deployment or manage the credential.
Configs
.gitlab-ci.yml
stages:
- dockerize
- s3
- deploy
dockerize:
  stage: dockerize
  script:
  - <DOCKERIZE_DO_SOMETHING>
s3:
  stage: s3
  script:
  - yarn install
  - yarn build
  - NODE_ENV=staging CDN_HOST_BUCKET=$CDN_HOST_BUCKET CDN_ACCESS_KEY_ID=$CDN_ACCESS_KEY_ID CDN_SECRET_ACCESS_KEY=$CDN_SECRET_ACCESS_KEY yarn s3:upload
  - NODE_ENV=production CDN_HOST_BUCKET=$CDN_HOST_BUCKET CDN_ACCESS_KEY_ID=$CDN_ACCESS_KEY_ID CDN_SECRET_ACCESS_KEY=$CDN_SECRET_ACCESS_KEY yarn s3:upload
deploy:
  stage: deploy
  script:
  - <DEPLOYMENT_SCRIPTS>
.gitlab-ci.yml
next.config.js
const version = require('package.json').version;

const config = {
  development: {
    assetPrefix: ''
  },
  staging: {
    assetPrefix: `https://static.com/CHOTOT_VEHICLE_STAGING/${version}`
  },
  production: {
    assetPrefix: `https://static.com/CHOTOT_VEHICLE_PRODUCTION/${version}`
  }
};

module.exports = config;
configs.js
const config = require('./config').config;

module.exports = {
  assetPrefix: config.assetPrefix,
  generateBuildId: async () => {
    return 'build';
  },
  webpack(config, options) {
    return config;
  }
};
next.config.js
Deployment
Problem
After building NextJS web app, it has the directory called “.next” and the structure of files is different from the URLs access to the static resources.
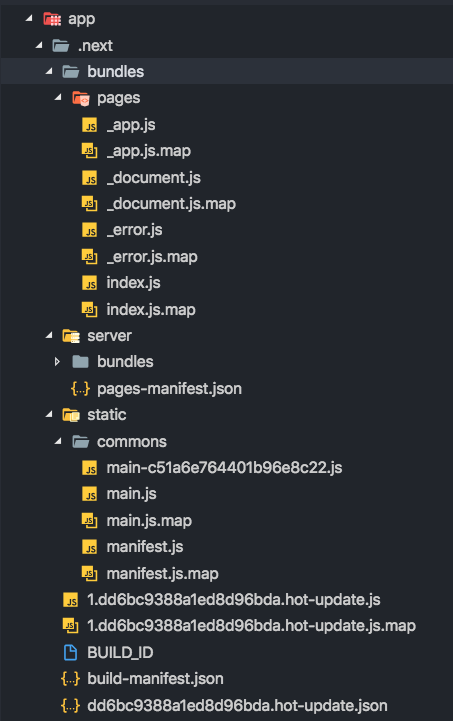
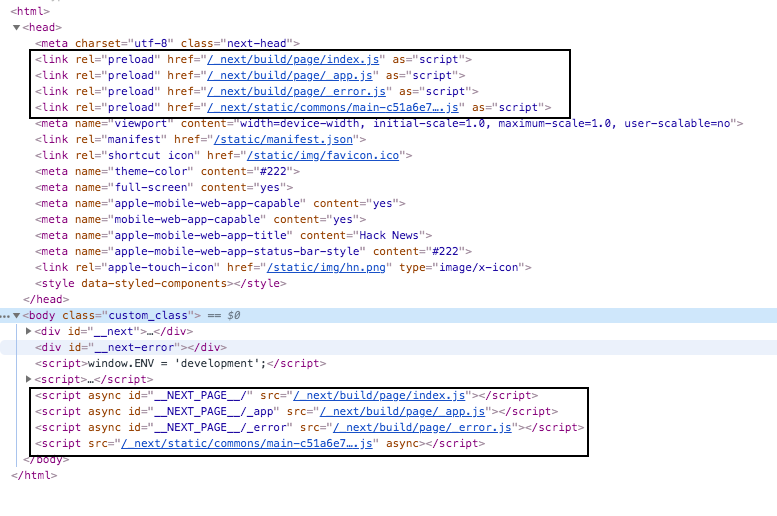
As you can see there are 2 different paths.
.next/bundles/pages/index.jsversus
/_next/build/page/index.jsSo if we upload the whole built directory to S3 and run our web application. It is absolutely not working.
Solution
Because of the deployment is separated from the development stage. So that we add one more stage before uploading built directory to S3 called “post-build”.
The “post-build” stage takes care of re-arranging the structure of files to match the structure of URLs which point to the files.
For example:
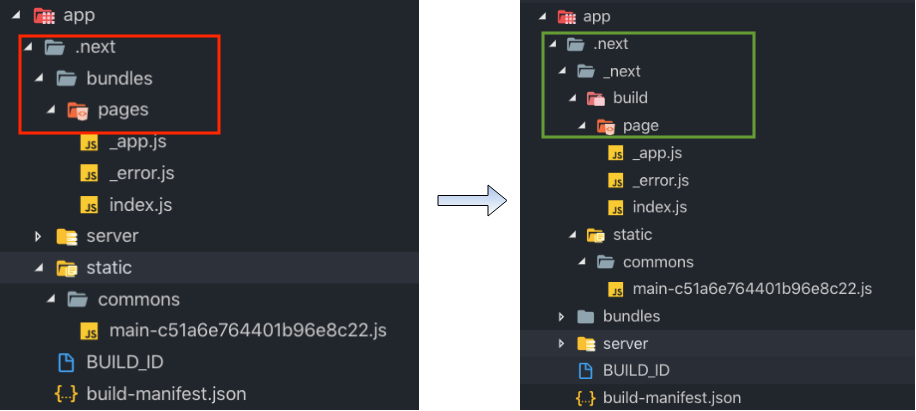
The post-build script
To create the post build, we created a small script which allow to re-structure the built directory. Each major changes from NextJS which created a new structure of built files. For this reason, each of “post-build” script need to adapt with NextJS major version.
var fs = require('fs');
var mv = require('mv');
var dirs = ['app/.next/_next', 'app/.next/_next/build', 'app/.next/_next/build/page', 'app/.next/_next/static'];

const PAGE_PATH = {
  old: 'app/.next/bundles/pages',
  new: 'app/.next/_next/build/page'
};

const STATIC_PATH = {
  old: 'app/.next/static',
  new: 'app/.next/_next/static'
};

// create dir
dirs.forEach(item => {
  fs.mkdirSync(item);
});

// move files
mv(PAGE_PATH.old, PAGE_PATH.new, { mkdirp: true }, function(err) {
  if (err) console.log(err);
});

mv(STATIC_PATH.old, STATIC_PATH.new, { mkdirp: true }, function(err) {
  if (err) console.log(err);
});
post-build-6.js
var fs = require('fs');
var mv = require('mv');
var dirs = [
  'app/.next/_next',
  'app/.next/_next/static',
];

const STATIC_PATH = {
  old: 'app/.next/static',
  new: 'app/.next/_next/static'
};

// create dir
dirs.forEach(item => {
  fs.mkdirSync(item);
});

mv(STATIC_PATH.old, STATIC_PATH.new, { mkdirp: true }, function(err) {
  if (err) console.log(err);
});
post-build-7.js
var fs = require('fs');
var mv = require('mv');

var dirs = ['.next/_next', '.next/_next/static'];

const STATIC_PATH = {
  old: '.next/static',
  new: '.next/_next/static'
};

// create dir
dirs.forEach(item => {
  fs.mkdirSync(item);
});

mv(STATIC_PATH.old, STATIC_PATH.new, { mkdirp: true }, function(err) {
  if (err) console.log(err);
});
post-build-8.js
Uploading to S3
After re-structuring the built files. Now all we need is some code to upload the whole build directory to S3. To to this, we created a small package called “s3-uploading” which helps us to make it.
var path = require('path');
var version = require('./package.json').version;
var Uploader = require('s3-uploading').default;
var env = (process.env.NODE_ENV || 'staging').toUpperCase();

var BUCKET_PATH = `<YOUR_BUCKET_NAME>_${env}/${version}`; // CHOTOT_VEHICLE_PRODUCTION/1.0.1

const options = {
  s3: {
    accessKeyId: process.env.CDN_ACCESS_KEY_ID,
    secretAccessKey: process.env.CDN_SECRET_ACCESS_KEY,
    endpoint: process.env.CDN_HOST_BUCKET,
    region: '',
    ACL: 'public-read',
    sslEnabled: false
  },
  upload: {
    directory: path.resolve(__dirname, '../../app/.next'), // path to built directory
    bucket: BUCKET_PATH
  }
};
const job = new Uploader(options);
job.upload();
upload-to-s3.js
Register scripts
One last thing we need to do is registering the scripts to execute the “uploading static resources to s3” step to package.json
{
  "scripts": {
    "s3:upload": "node ./deployment/s3",
    "start": "node ./server",
    "build": "next build app",
    "postbuild": "node ./deployment/post-build"
  },
}
scripts section with s3 uploading in package.json
Result
Here are the results of staging and production environment.
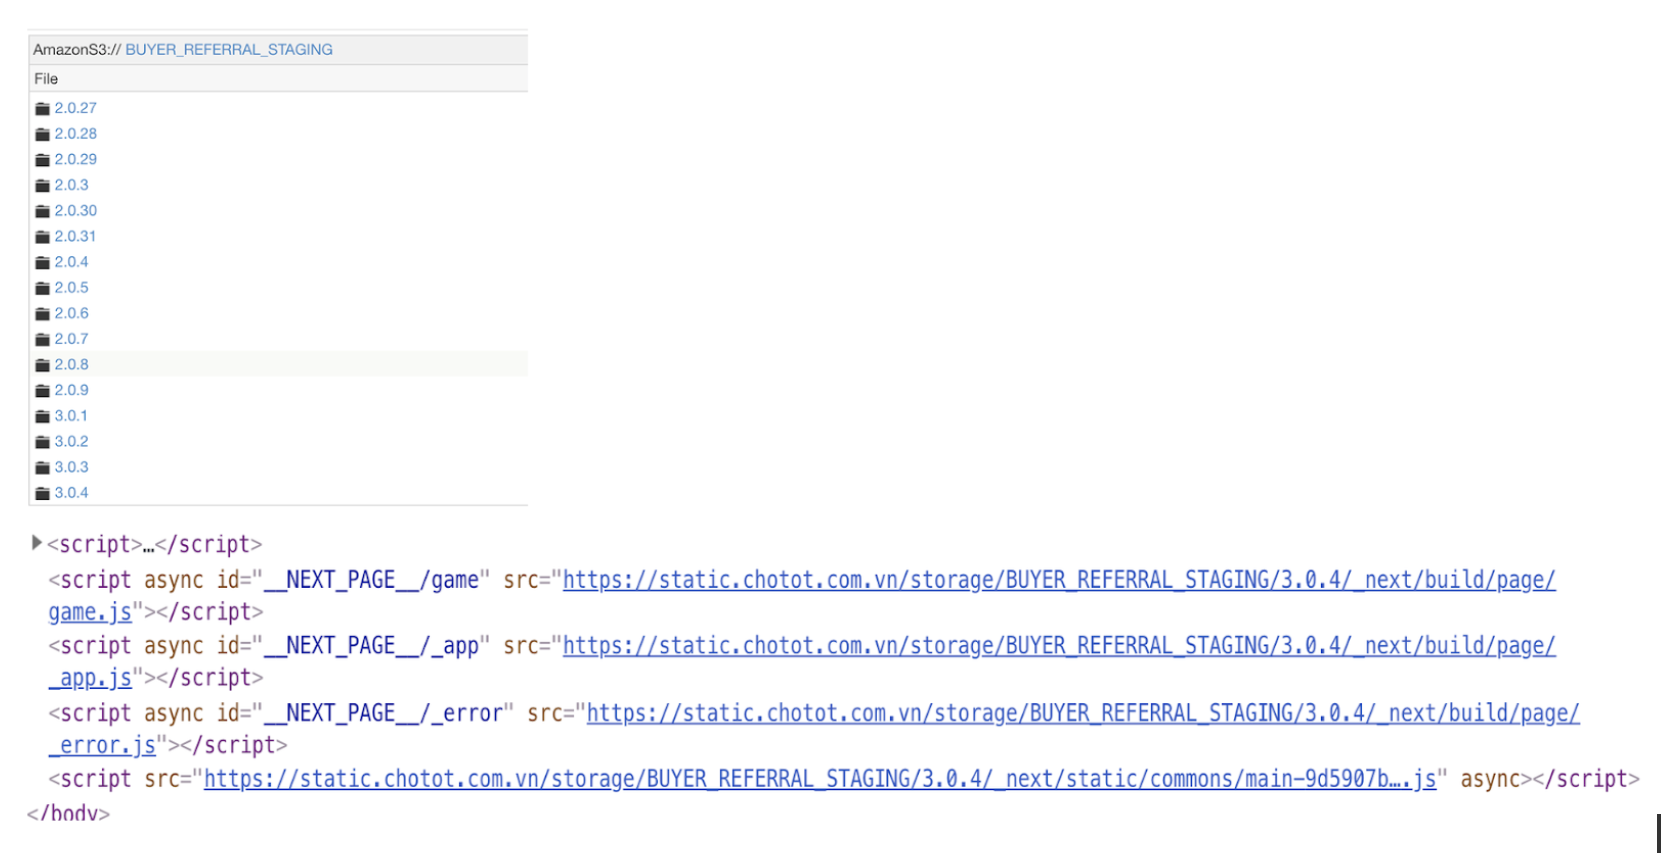
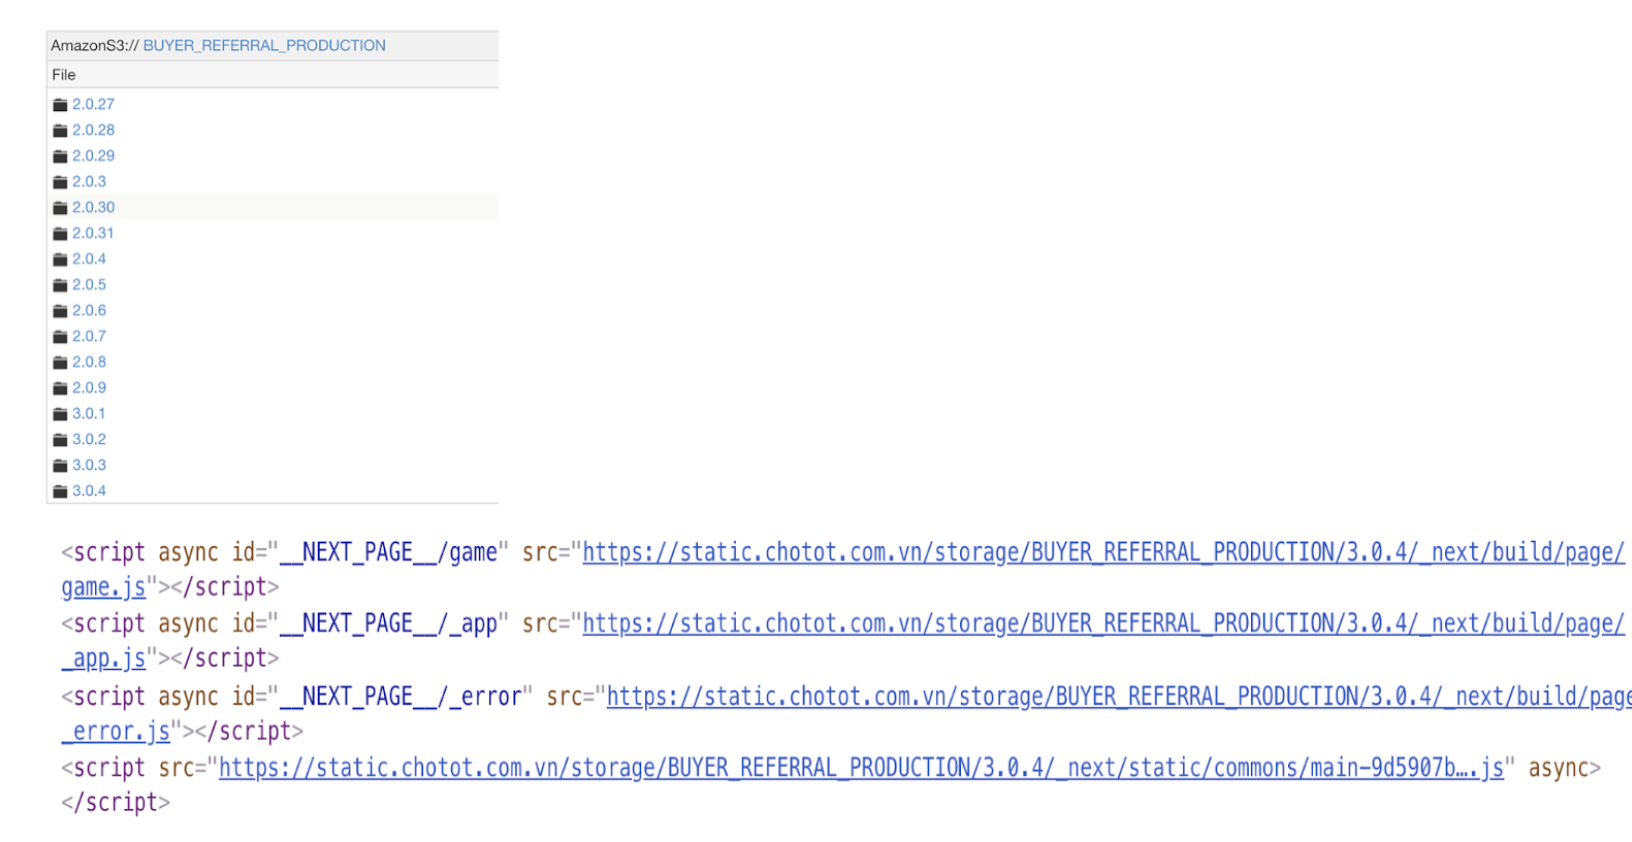
As you can see, we manage the static resources based on the version from “package.json”. We follow Semantic versioning, more detail here. In each release, we update the version and then upload them to S3.
Conclusion
With the optimization above, we cut down from n (n > 1) steps of the deployment into 1 step. It brings some of the benefits.
- Speeding up the development time.
- Less depending on the other team.
- Caching of static resource versioning is well taken cared of (Because we store all static resources based on the version).
- Fully control by the web team.
If you’re interested in it, make sure you check out our repos.
You can find this article also at dev.to!!!